Obtaining, reissuing and installing SSL certificates across various pieces of Artsy infrastructure (read about our tech stack here) is a mind-numbing excercise dreaded by every platform engineer. Few people really understand what’s going on, installing SSL certificates is right up there in the opaque world of user-unfriendliness, along with onboarding a new iOS developer in an organization with Xcode.
Still, it can be done - below is our cookbook.

Buying an SSL Certificate
We buy our SSL certificates from rapidsslonline.com. You’ll be immediately overwhelmed and confused by the many brand names, including Symantec, RapidSSL, Thawte and GeoTrust and the mentions of “no extra cost”, “cheap” and “quality”. We buy two kinds of GeoTrust certificates: GeoTrust True BusinessID with Extended Validation and GeoTrust True BusinessID Wildcard. We typically get those for a at least 2 years, trying to balance the pain of installing them with the time it takes our short collective memory to forget how to obtain and deploy an SSL cert.
When buying extended validation certificates you will need an administrative and a technical contact, a working company phone number and a public entry such as yellow pages. You’ll need to begin by making a CSR, which is explained below.
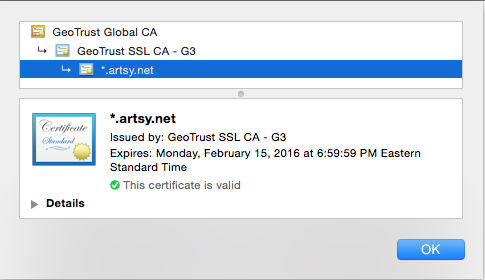
GeoTrust SAN True BusinessID with Extended Validation
This certificate lets us have the green Artsy Inc. pictured above and to list multiple domains - SAN stands for Subject Alternative Names. To obtain it your company must have a public record with the Better Business Bureau or YellowPages.com with a working phone number. You will have to fill out an Acknowledgement Agreement, that will make everything seem more legit. This certificate requires you to list hostnames. You can purchase additional names when needed and reissue the certificate - we typically include www.artsy.net, m.artsy.net, etc.
GeoTrust True BusinessID Wildcard
This certificate can be installed on anything.example.com which is great for both test and production systems - we use SSL everywhere.
Obtaining Certificates
Installing OpenSSL
Install OpenSSL (typically via brew install openssl).
Organizing Files and Keeping it Safe
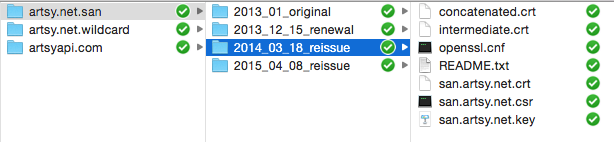
You will want to organize your certificate files into folders, by name, type and date. We typically place everything in a shared Dropbox folder that is only accessible to engineering operations. Ours looks like this:
Generating CSRs
For the examples below we’ll use an example.com domain.
The first step is to generate a Certificate Signing Request (CSR). The important information in the CSR is your location and the e-mail address.
Wildcard Certificates
$ openssl req -new -newkey rsa:2048 -nodes -keyout example.com.key -out example.com.csr

Generating a 2048 bit RSA private key
....................+++
..............+++
writing new private key to 'example.com.key'
-----
You are about to be asked to enter information that will be incorporated
into your certificate request.
What you are about to enter is what is called a Distinguished Name or a DN.
There are quite a few fields but you can leave some blank
For some fields there will be a default value,
If you enter '.', the field will be left blank.
-----
Country Name (2 letter code) [AU]:US
State or Province Name (full name) [Some-State]:New York
Locality Name (eg, city) []:New York
Organization Name (eg, company) [Internet Widgits Pty Ltd]:Example, Inc.
Organizational Unit Name (eg, section) []:
Common Name (eg, YOUR name) []:*.example.com
Email Address []:it@example.com

Please enter the following 'extra' attributes
to be sent with your certificate request
A challenge password []:
An optional company name []:
The above creates two files: example.com.csr (the CSR) and example.com.key (a private key to sign the CSR and the future certificate).
SAN Certificates
This is slightly different than for a wildcard certificate. From a new folder, copy the OpenSSL configuration file.
$ cp /System/Library/OpenSSL/openssl.cnf .
Edit the file as follows.
Inside the v3_req section uncomment req_extensions. This will tell OpenSSL to include this section in the CSR.
[req]
req_extensions = v3_req
Create the v3_req section with the following information along with the DNS names that will be used for the EV certificate. This can be changed later, and additional names can be bought, but will require re-issuing the certificate.
[ v3_req ]
basicConstraints = CA:FALSE
keyUsage = nonRepudiation, digitalSignature, keyEncipherment
subjectAltName = @alt_names

[alt_names]
DNS.1 = example.com
DNS.2 = www.example.com
DNS.3 = m.example.com
DNS.4 = api.example.com
Generate the CSR.
$ openssl req -new -out san.example.com.csr -newkey rsa:2048 -nodes -keyout san.example.com.key -config openssl.cnf

Country Name (2 letter code) [US]:US
State or Province Name (full name) [New York]:New York
Locality Name (eg, city) []:New York
Organization Name (eg, company) [Example, Inc.]:Example, Inc.
Organizational Unit Name (eg, section) []:
Common Name (eg, YOUR name) []:example.com
Email Address []:it@example.com

Please enter the following 'extra' attributes
to be sent with your certificate request
A challenge password []:
An optional company name []:
This creates san.example.com.csr and san.example.com.key. Check that it includes the correct information.
$ openssl req -text -noout -in san.example.com.csr

Subject: C=US, ST=New York, L=New York, O=Example, Inc./emailAddress=it@example.com
Requested Extensions:
  X509v3 Basic Constraints:
    CA:FALSE
  X509v3 Key Usage:
    Digital Signature, Non Repudiation, Key Encipherment
  X509v3 Subject Alternative Name:
    DNS:example.com, DNS:www.example.com, DNS:m.example.com, DNS:api.example.com
Buying the Certificate
When buying a certificate you will be asked to copy-paste the contents of the CSR generated above. There will be some back-and-forth for the verification process over e-mail and phone. The GeoTrust authenticator will be happy to hear that your yellow pages listing’s phone number matches their records.
Certificate E-Mail
Once issued you will receive an e-mail with the certificate. It contains the web server certificate (save it as example.com.crt) and an intermediate certificate (save it as example.com.intermediate.crt).
For RapidSSL you will also need more intermediate CAs, currently obtained from here. You can get them as a bundle (we save it as intermediate.crt) or separately (we save these as intermediate-primary.crt and intermediate-secondary.crt).
Installing Certificates
Heroku
You need the SSL endpoint addon to upload the certificate to Heroku. The certificate must be a concatenation of your certificate and all intermediaries. For our RapidSSL certificates this is usually made as follows.
$ cat example.com.crt intermediate.crt > concatenated.crt

$ heroku certs:add concatenated.crt example.com.key --app example-app

Adding SSL endpoint to example-app... done
example-app now served by tokyo-7171.herokussl.com
Certificate details:
    subject: /serialNumber=xyz/OU=GT65834870/OU=See www.rapidssl.com/resources/cps (c)13/OU=Domain Control Validated - RapidSSL(R)/CN=*.example.com
    start date: 2013-01-13 18:21 EST
    expire date: 2014-01-17 01:55 EST
    common name(s): *.example.com, example.com
    issuer: /serialNumber=yz/OU=GT65834870/OU=See www.rapidssl.com/resources/cps (c)13/OU=Domain Control Validated - RapidSSL(R)/CN=*.example.com
    SSL certificate is verified by a root authority.
If you have a certificate already installed, update it.
$ heroku certs:update concatenated.crt example.com.key --app example-app
Heroku is known to patch common certificate issues during this process, such as certificates listed out of order.
OpsWorks
OpsWorks offers 3 SSL fields in the application configuration (choose Apps, then Edit the app):
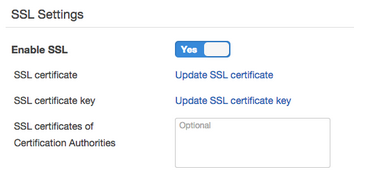
The SSL Certificate should be the same contents of the concatenated.crt we made above.
The SSL Certificate key should be the contents of example.com.key.
The SSL Certificates of Certification Authorities should be left empty.
The OpsWorks application will need to be redeployed for the new certificates to be installed.
AWS ELB
Login to AWS, go to EC2 Instances, click on Load Balancers, find your load-balancer and choose the Listeners tab. You can upload or choose a certificate here.

The Private Key should be example.com.key.
The Public Key Certificate should be the contents of example.com.crt.
The Certificate Chain is the most problematic, it needs to list the entire chain, in our case it’s a concatenation of example.com.intermediate.crt, then intermediate-primary.crt, and the root certificate for issuer of the latter, which is the Equifax Secure Certificate Authority from here.
When the chain is incorrect the generic error message is “Unable to validate the certificate chain.” It took us a few tries and a bit of help from the AWS forums.
Reissuing a Certificate
Recently we had to upgrade our certificates from those signed using a SHA-1 hash algorithm to those signed with the SHA-256 algorithm, and had to change DNS names in the SAN certificate.
Find the order on RapidSSLOnline (you will likely have to change the start date of your search), and follow the link to reissue the certificate at the bottom. Create a new CSR, as for any new certificate. No need to choose a specific web server type and make sure to check SHA-256 for the signature method. You will need to go through all the same motions for a reissued certificate as for a new one.
Verifying a Certificate
Verify that your certificate is correct and contains all the right intermediaries.
$ openssl s_client -CApath /etc/ssl/certs/ -connect example.com:443

SSL-Session:
    Protocol  : TLSv1
    Cipher    : AES256-SHA
    Session-ID: A746CC85733F16630CA9CBD12FD1A0379CEC22649C1558D12B575529815F8E67
    Session-ID-ctx:
    Master-Key: 09EBFF52D4F673FA0FA5B6BD1151722CF96197711430BCA35B01D6AA2803F8904D834F4EEB151E6354601FEC55CDFDCA
    Key-Arg   : None
    Start Time: 1428507204
    Timeout   : 300 (sec)
    Verify return code: 0 (ok)
You want the Verify return code: 0 (ok) message at the bottom. Pay attention to other errors, a common one may be verify error:num=19:self signed certificate in certificate chain, which can be ignored and verify error:num=20:unable to get local issuer certificate, which is a real problem and means you’re missing an intermediate certificate.
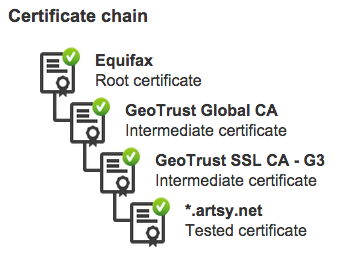
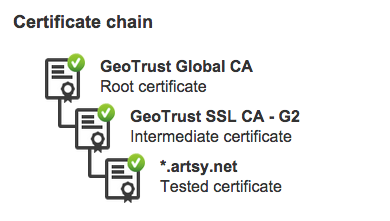
A simpler way to check is to use the GeoTrust SSL Checker. The certificate chain can go all the way up to the root, although including the root is not technically necessary or recommended.
Comments