We recently picked up a Rails application that was a few features away from completion. This application allows our Genome Team to classify multiple artworks based on visual and art historical characteristics. These characteristics, or “genes”, can be added, removed, and changed for any of the artworks on the panel.
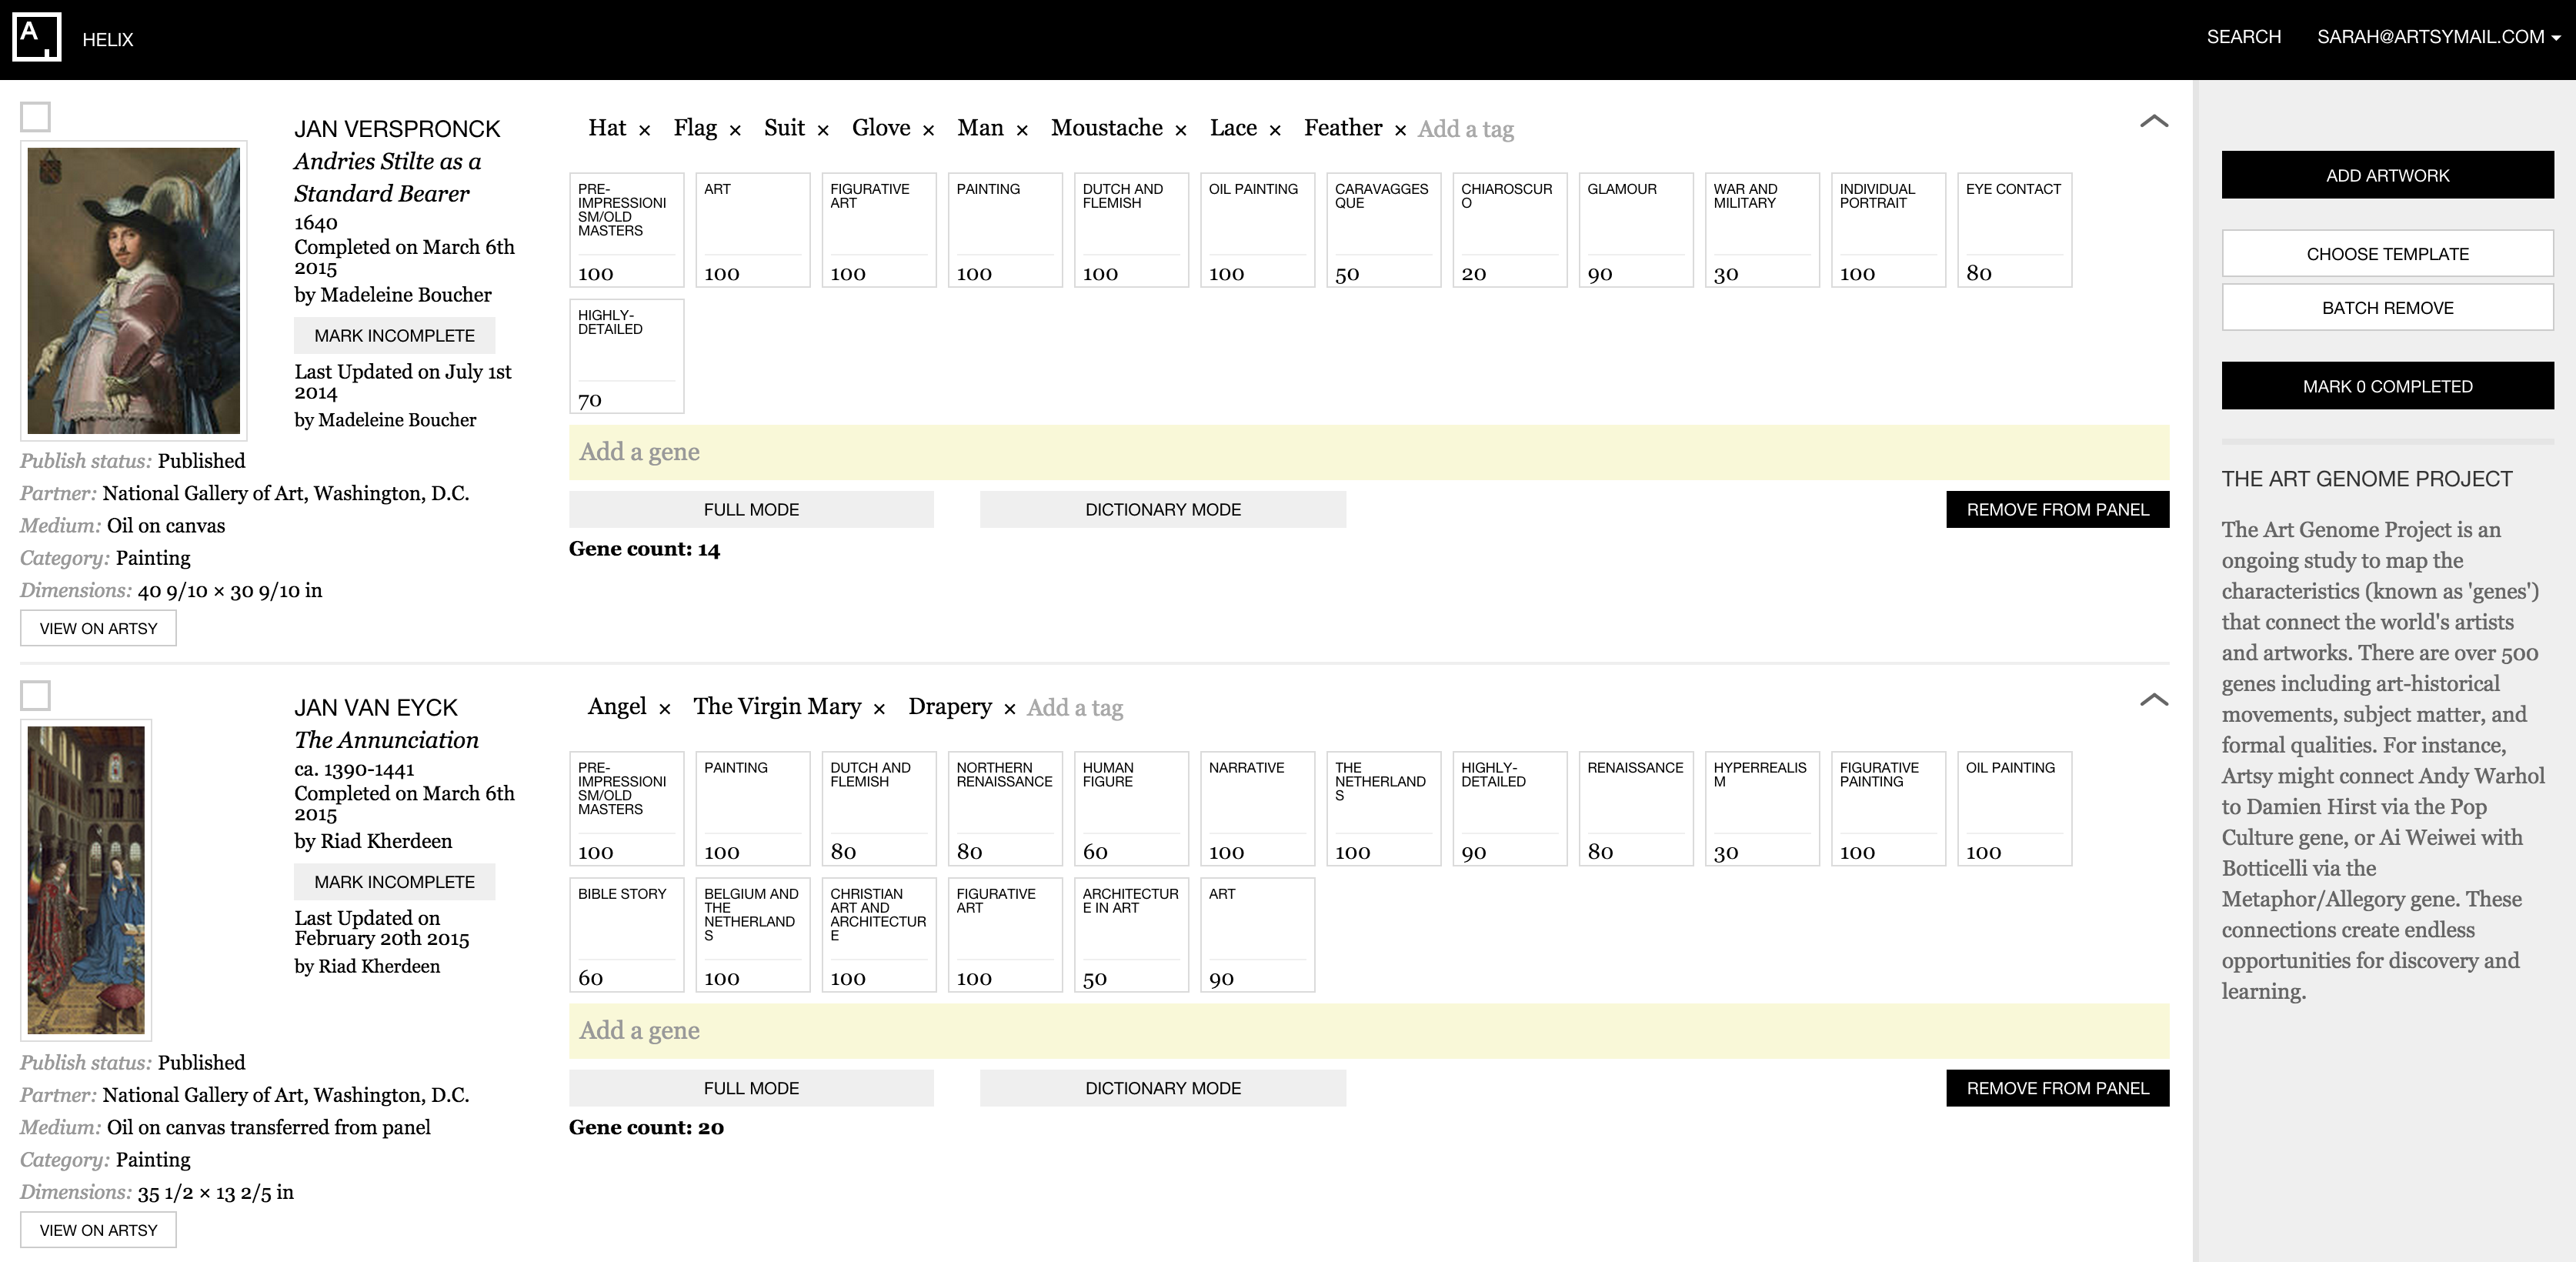
Our genomers are masters of efficiency, and over the years we have worked closely with them to tailor a dynamic interface to their specific workflow.
When we started working on the app, the back-end was organized, modular, and interfaced seamlessly with the Artsy API, but there were still a few front-end features we needed to implement before it could be used by the Genome Team. The app did not use a front-end framework, and as our features scaled it was difficult to keep track of UI state with pure CoffeeScript and global event listeners. Eventually, we decided to stop trying to patch our leaky roof and build a new one.
Choosing a Suitable Framework
We decided to introduce a front-end framework to make it easier to add new features, and spent a day researching different options. Our requirements were:
- A robust view layer that could work on top of our already-solid Rails back-end,
- A framework performant enough for an interaction-heavy single-page app with hundreds of editable fields autosaving on change,
- A streamlined framework that favors freedom over unnecessary structure.
We chose React, Facebook’s view layer framework, because it provides much-needed structure and support for components in a single page app without too much boilerplate.
Our plan was to eventually replace all of the existing *.haml.erb templates and global CoffeeScript mixins with
discrete React components. We used the react-rails gem, which easily
integrates React components with Rails views.
In line with the React tutorial, we first broke up our UI into functional and visual components. For each component we found the relevant HAML template, converted it into jsx and React components using dummy data, and eventually updated it to accept the correct state from our top-level component which did all of the dynamic fetching and saving. Then we deleted the associated HAML and CoffeeScript code.
Thinking the React Way
At this point we have replaced the majority of the app’s front-end with React components. We love React because it encourages you to follow certain ideological conventions, but it does not force you into a structure that may not exactly align with your goals.
In React, having a single source of truth is ideal. Gone are liberally distributed global event listeners that can conflict and cause pages to get bogged down with transition logic. State is held at the topmost level in React and when state changes, React automatically re-renders only the affected components.
For example, we hold a hash artworks in the highest-level state of the page:
getInitialState: function() {
  var artworks = _.map(this.props.artwork_ids, function(id) {
    return [id, {
      _id: id,
      isLoaded: false,
      isSelected: false,
      isMinimized: false
    }];
  });
  return {
    artworks: _.object(artworks),
    ...
  }
},
We also store a method at this level to update the artworks state when there is a change:
updateArtwork: function(artwork_id, cb) {
  // finds an artwork, passes it to callback (cb) to be mutated,
  // sets the mutated artwork on state from the return value of
  // the callback
  var new_artwork = cb(this.state.artworks[artwork_id]);
  var state_copy = this.state;
  state_copy.artworks[artwork_id] = new_artwork;
  this.setState(state_copy);
},
That method is passed to child components, and when there is an update to an artwork, such as when it becomes
selected, we invoke it to update all affected components:
changeIsSelected: function (e) {
  e.preventDefault();
  var newSelectedState = !this.props.artwork.isSelected;
  this.props.updateArtwork(this.props.artwork._id, function(artwork) {
    artwork.isSelected = newSelectedState;
    return artwork;
  })
},
React lets us define our components and interactions in a declarative style instead of stringing together possible transitions triggered by events. Before converting this app to React, we had many bugs around form submission and saving genome progress. However, by modeling state instead of UI transitions, we can easily track changes and save progress incrementally in the background without requiring a page refresh from the user.
From CoffeeScript to React: Selecting Artworks
In this app, genomers are able to ‘select’ artworks on the panel for the purposes of saving and conducting batch actions. In our initial implementation, clicking the ‘select all’ button would individually click each artwork and used global event listeners to change UI state:
($ 'body').on 'click', '.artwork-selector', (evt) ->
  container = $(this)
  currentSlug = container.data('id')
  artworkIdsElement = $('#selected_artwork_ids')
  selectedArtworkIds = _.compact(_.uniq(artworkIdsElement.val().split(',')))
  indexOfCurrentSlug = selectedArtworkIds.indexOf(currentSlug)
  if selectedArtworkIds.indexOf(currentSlug) != -1
    selectedArtworkIds.splice(indexOfCurrentSlug, 1)
    container.text('Not selected')
    container.removeClass('btn-purple')
  else
    selectedArtworkIds.push currentSlug
    container.text('Selected')
    container.addClass('btn-purple')
  $('#selected_artwork_ids').val(selectedArtworkIds.join(','))
  return false
With React, we store whether or not an artwork is selected as part of our state, and the appearance of elements
results from this variable. We use class sets
to dynamically alter styles such as button color. When the selected state changes, React re-renders all
components that depend on that variable.
var SelectedButton = React.createClass({
  changeIsSelected: function(e) {
    e.preventDefault()
    var newSelectedState = !this.props.artwork.isSelected
    this.props.updateArtwork(this.props.artwork._id, function(artwork) {
      artwork.isSelected = newSelectedState
      return artwork
    })
  },
  render: function() {
    var cx = React.addons.classSet
    var selectedButtonClasses = cx({
      "btn-purple": this.props.artwork.isSelected,
      "btn-tiny": true,
      btn: true,
      "artwork-selector": true
    })
    return (
      <div className="panel-artwork-actions">
        <a className={selectedButtonClasses} data-id="false" href="#" onClick={this.changeIsSelected}>
          {this.props.artwork.isSelected ? "" : "Not "}Selected
        </a>
      </div>
    )
  }
})
Challenges
React’s Virtual DOM
React keeps track of a Virtual DOM created by components you define. This can lead to issues, especially when trying to integrate React with jQuery plugins. For example, our modals kept showing up within other components until we explicitly rendered them on the outermost level. We also had issues trying to use an existing drag/drop plugin with the way we set up our state, and ended up building one from scratch.
React also crashes when the Virtual DOM becomes out-of-sync with the page DOM. We unearthed a mysterious bug in
which the browser was automatically inserting a tbody tag when it saw a table rendered without one… causing
React (and therefore our entire app) to crash. In order to rectify this, we had to explicitly include these
normally optional tags:
if (geneList.length) {
  var results = (
    <table className="triple-margin-top">
      <thead>{DictionaryView.header}</thead>
      <tbody>{geneList}</tbody>
    </table>
  )
} else {
  var results = null
}
Working with the React Lifecycle
Sometimes it is unavoidable to model transitions directly with JavaScript/jQuery, instead of using React’s built-in lifecycle methods. In one case, we had to dynamically change the top padding of a component based on the height of a different one. Although we tried to do this using the React lifecycle methods, there ended up being too many edge cases and we were having to add more and more states just to avoid:
currentTemplateHeight = $(".panel-template-wrap").height()
$(".panel-data-items").css("padding-top", currentTemplateHeight)
In this case, we found it more straightforward to go with the jQuery solution.
React == Refactor
When we started out converting the app to React, it was hard to know whether or not an element should be its own component or if it could exist within another one. Often when we add new features, we have to refactor to make sure that we are reusing components and maintaining a single source of truth.
For example, we originally had one component to hold metadata on an artwork, such as artist, title, and date:
var PanelArtworkInfo = React.createClass({
  ...
  render: function() {
    var artistName;
    var artworkTitle;
    var artworkDate;
    ...
    if (this.props.artwork.artist && this.props.artwork.artist['name']) {
      artistName = <ArtistName artwork={this.props.artwork} setTemplateArtistId={this.props.setTemplateArtistId} />;
    } else {
      artistName = <span>Unattributed</span>;
    }
    artworkTitle = this.props.artwork.title ? this.props.artwork.title : 'Untitled';
    artworkDate = this.props.artwork.date ? this.props.artwork.date : 'No Date';
    ...
    return (
      <div className="dummy-wrap">
        <div className="row">
          ...
          <div className="col-sm-6">
            <div className="artist-name">
              {artistName}
            </div>
            <div className="title">
              {artworkTitle}
            </div>
            <div className="date">
              {artworkDate}
            </div>
            ...
          </div>
        </div>
        ...
      </div>
    );
  }
});
When we implemented a new ‘minimized’ view for artworks, we also showed the title and artist, and so we broke these bits of information into separate components:
var ArtistName = React.createClass({
  handleClick: function() {
    if (this.props.artwork.artist["name"]) {
      this.props.setTemplateArtistId(this.props.artwork.artist["_id"])
    }
  },
  render: function() {
    var artistName
    if (this.props.artwork.artist && this.props.artwork.artist["name"]) {
      artistName = (
        <a
          className="artist-as-template-link"
          data-template-id={this.props.artwork.artist["_id"]}
          onClick={this.handleClick}
          data-template-type="Artist"
          href="#"
        >
          {this.props.artwork.artist["name"]}
        </a>
      )
    } else if (this.props.artwork["cultural_maker"]) {
      artistName = <span>{this.props.artwork["cultural_maker"]}</span>
    } else {
      artistName = <span>Unattributed</span>
    }
    return <div className="artist-name">{artistName}</div>
  }
})

var ArtworkTitle = React.createClass({
  render: function() {
    var artworkTitle = this.props.artwork.title ? this.props.artwork.title : "Untitled"
    return <div className="title">{artworkTitle}</div>
  }
})

var ArtworkDate = React.createClass({
  render: function() {
    var artworkDate = this.props.artwork.date ? this.props.artwork.date : "No Date"
    return <div className="date">{artworkDate}</div>
  }
})
And updated our parent to reuse the new child components:
var PanelArtworkInfo = React.createClass({
  ...
  render: function() {
    ...
    return (
      <div className="dummy-wrap">
        <div className="row">
          ...
          <div className="col-sm-6">
            <ArtistName artwork={this.props.artwork} setTemplateArtistId={this.props.setTemplateArtistId} />
            <ArtworkTitle artwork={this.props.artwork} />
            <ArtworkDate artwork={this.props.artwork} />
            ...
          </div>
        </div>
        ...
      </div>
    );
  }
});
Writing Specs
All of the existing specs for the app were written in RSpec, so we chose to write integration tests using RSpec+Capybara. The headless Capybara webkit did not integrate with our React setup, so we switched to using Selenium as our Capybara JavaScript driver (which also conveniently let us debug our specs within the browser).
Our main challenge with specs had to do with RSpec not waiting long enough for components (such as autocomplete results) to appear, perhaps due to React’s Virtual DOM. We spent many sad hours debugging spurious tests, and even included a few dreaded ‘sleep’ commands. Eventually, we integrated the rspec-retry gem to retry spurious tests during CI.
Conclusion
Converting our app to use a React-based front-end went surprisingly smoothly. We were able to incrementally change certain templates to React components, which made it easy to test as we went along. Additionally, our development time in adding new features since then has decreased dramatically. It is much easier to add new components or edit existing ones when there is a single source of truth and you don’t have to search through global event listeners.
Choosing a front-end framework is non-trivial but incredibly important, and we are glad we found React. Because it does not require much overhead and it is possible to only use it on a portion of a page, React can be integrated into small or large projects. Although we deliberated for a long time over whether or not to use a framework, we never regretted moving to React and investing in the future of the app.
Comments