Why do so many companies write a homegrown pageviews tracking system? Between Google Analytics, Kissmetrics and many others, isn’t that a completely solved problem?

These popular solutions lack domain knowledge. They are easily capable of segmenting users by region or browser, but they fail to recognize rules core to your business. Tracking pageviews with a homegrown system becomes your next sprint’s goal.

Implementing a hit counter service is quite tricky. This is a write-heavy, asynchronous problem that must minimize impact on page rendering time, while dealing with rapidly growing amounts of data. Is there a middle ground between using Google Analytics and rolling out our own homegrown implementation? How can we use Google Analytics for data collection and inject domain knowledge into gathered data, incrementally, without writing our own service?

Let’s write a Rake task that pulls data from Google Analytics. We can run it daily. Start with a Ruby gem called Garb.

gem "garb", "0.9.1"

Garb requires Google Analytics credentials. Those can go into a YAML configuration file, which will use environment settings in production (it’s an ERB template, too). We can hardcode the test account values.

``` yaml config/google_analytics.yml defaults: &defaults

development, test: «: *defaults email: “ga@example.com” password: “password” ua: “UA-12345678-1”

production: «: *defaults email: <%= ENV[‘GOOGLE_ANALYTICS_EMAIL’] %> password: <%= ENV[‘GOOGLE_ANALYTICS_PASSWORD’] %> ua: <%= ENV[‘GOOGLE_ANALYICS_UA’] %>


Establish a Google Analytics session and fetch the profile corresponding to the Google user account with Garb.

``` ruby
config = YAML.load(ERB.new(File.new(Rails.root.join("config/google_analytics.yml")).read).result)[Rails.env].symbolize_keys
Garb::Session.login(config[:email], config[:password])
profile = Garb::Management::Profile.all.detect { |p| p.web_property_id == config[:ua] }
raise "missing profile #{config[:ua]} in #{Garb::Management::Profile.all.map(&:web_property_id)}" unless profile

Garbs needs a data model to collect pageviews. It extends Garb::Model and defines a set of “metrics” and “dimensions”.

``` ruby app/models/google_analytics_pageviews.rb class GoogleAnalyticsPageviews extend Garb::Model metrics :pageviews dimensions :page_path end


You can play with the [Google Analytics Query Explorer](http://ga-dev-tools.appspot.com/explorer/) to see the many possible metrics (such as pageviews) and dimensions (such as requested page path).

By default, Google Analytics lets clients retrieve 1000 records in a single request. To get all records we can add an iterator, called `all`, that will keep making requests until the server runs out of data. The code for *config/initializers/garb_model.rb* is [in this gist](https://gist.github.com/2265877) and I made a [pull request](https://github.com/vigetlabs/garb/pull/116) into Garb if you'd rather merge that onto your fork.

The majority of our pages are in the form of "/model/id", for example "/artwork/leonardo-mona-lisa". We're interested in all pageviews for a given artwork and in pageviews for a given artist, at a given date. We'll store selected Google Analytics data in a `GoogleAnalyticsPageviewsRecord` model described further.

``` ruby
t = Date.today - 1
GoogleAnalyticsPageviews.all(profile, { :start_date => t, :end_date => t }) do |row|
  model = /^\/#\!\/(?<type>[a-z-]+)\/(?<id>[a-z-]+)$/.match(row.page_path)
  next unless (model[:type] == "artwork" || model[:type] == "artist")
  GoogleAnalyticsPageviewsRecord.create!({
    :model_type => model[:type],
    :model_id => model[:id],
    :pageviews => row.pageviews,
    :dt => t.strftime("%Y-%m-%d")
  })
end

Each GoogleAnalyticsPageviewsRecord contains the total pageviews for a given model ID at a given date. We now have a record for each artwork and artist. We can rollup existing data into a set of collections, incrementally. For example, google_analytics_artworks_monthly will contain the monthly hits for each artwork.

class GoogleAnalyticsPageviewsRecord
  include Mongoid::Document

  field :model_type, type: String
  field :model_id, type: String
  field :pageviews, type: Integer
  field :dt, type: Date

  index [
    [:model_type, Mongo::ASCENDING],
    [:model_id, Mongo::ASCENDING],
    [:dt, Mongo::DESCENDING]
  ], :unique => true

  after_create :rollup

  def rollup
    Mongoid.master.collection("google_analytics_#{self.model_type}s_total").update(
      { :model_id => self.model_id },
      { "$inc" => { "count" => self.pageviews }}, { :upsert => true })
    {
      :daily => self.dt.strftime("%Y-%m-%d"),
      :weekly => self.dt.beginning_of_week.strftime("%Y-%W"),
      :monthly => self.dt.beginning_of_month.strftime("%Y-%m"),
      :yearly => self.dt.beginning_of_year.strftime("%Y")
    }.each_pair do |t, dt|
      Mongoid.master.collection("google_analytics_#{self.model_type}s_#{t}").update(
        { :model_id => self.model_id, :dt => dt },
        { "$inc" => { "count" => self.pageviews }}, { :upsert => true })
    end
  end

end

The rollup lets us query these tables directly. For example, the following query returns a record with the pageviews for the Leonardo’s “Mona Lisa” in January 2012.

Mongoid.master.collection("google_analytics_artworks_monthly").find_one({
  :model_type => "artwork", :model_id => "leonardo-mona-lisa", :dt => "2012/01"
})

One of the obvious advantages of pulling Google Analytics data is the low volume of requests and offline processing. We’re letting Google Analytics do the hard work of collecting data for us in real time and are consuming its API without the performance or time pressures.
Often times people will use border-bottom: 1px solid in favor of text-decoration: underline to give their links some breathing room. But what if you’re giving it too much breathing room and want to adjust the height of that underline. With Adobe Garamond that happened to be the case, so we’ve come up with this little css trick:

a {
  display: inline-block;
  position: relative;
}
a::after {
  content: '';
  position: absolute;
  left: 0;
  display: inline-block;
  height: 1em;
  width: 100%;
  border-bottom: 1px solid;
  margin-top: 5px;
}

This overlays a CSS pseudo element with a border-bottom that can be adjusted by changing margin-top.

For handling browsers that don’t support pseudo elements I recommend targeting them with the Paul Irish class-on-html-trick.

Let your links breathe!

Did you know that Netflix has hundreds of API versions, one for each device? Daniel Jacobson’s Techniques for Scaling the Netflix API at QConSF 2011 explained why they chose this model. And while we don’t all build distributed services that supply custom-tailored data to thousands of heterogeneous TVs and set-top boxes, we do have to pay close attention to API versioning from day one.

Versioning is hard. Your data models evolve, but you must maintain backward-compatibility for your public interfaces. While many strategies exist to deal with this problem, we’d like to propose one that requires very little programming effort and that is more declarative in nature.

At Artsy we use Grape and implement the “path” versioning strategy from the frontier branch. Our initial v1 API is consumed by our own website and services and lives at https://artsyapi.com/api/v1. We’ve also prototyped v2 and by the time v1 is frozen, it should already be in production.

Grape takes care of version-based routing and has a system that lets you split version-based presentation of a model from the model implementation. I find that separation forcefully induced by unnecessary implementation complexity around wanting to return different JSON depending on the API version requested. What if implementing versioning in as_json were super simple?

Consider a Person model returned from a v1 API.

class API < Grape::API
  prefix :api
  version :v1
  namespace :person
    get ":id"
      Person.find(params[:id]).as_json
    end
  end
end
class Person
  include Mongoid::Document

  field :name

  def as_json
    {
      name: name
    }
  end

end

In v2 the model split :name into a :first and :last name and in v3 :name has finally been deprecated. A version v3 Person model would look as follows.

class Person
  include Mongoid::Document

  field :first
  field :last

  def as_json
    {
      first: first,
      last: last
    }
  end

end

How can we combine these two implementations and write Person.find(params[:id]).as_json({ :version => ? })?

In mongoid-cached-json we’ve introduced a declarative way of versioning JSON. Here’s the code for Person v3.

class Person
  include Mongoid::Document
  include Mongoid::CachedJson

  field :first
  field :last

  def name
    [ first, last ].join(" ")
  end

  json_fields \
    name: { :versions => [ :v1, :v2 ] },
    first: { :versions => [ :v2, :v3 ] },
    last: { :versions => [ :v2, :v3 ] }

end

With the mongoid-cached-json gem you also get caching that respects JSON versioning, for free. Read about it here.

Sometimes you type a hash-bang URL too fast, bang first.

Consider https://artsy.net/!#/log_in. Rails will receive /! as the file path, resulting in a 404, File Not Found error. The part of the URL after the hash is a position within the page and is never sent to the web server.

It’s actually pretty easy to handle this scenario and redirect to the corresponding hash-bang URL.

The most straightforward way is to create a file called !.html in your public folder and use JavaScript to rewrite the URL with the bang-hash.

``` html public/!.html

Click here if you're not redirected ...

You can also do this inside a controller with a view or layout. Start by trapping the URL in your `ApplicationController`.

``` ruby app/controllers/application_controller.rb
if request.env['PATH_INFO'] == '/!'
  render layout: "bang_hash"
  return
end

The layout can have the piece of JavaScript that redirects to the corresponding hash-bang URL.

``` ruby app/views/layouts/bang_hash.html.haml !!!

  • ie_tag(:html) do %body :javascript window.location = ‘/#!’ + window.location.hash.substring(1) ```

You can quickly reduce the amount of data transferred from your Rack or Rails application with Rack::Deflater. Anecdotal evidence shows a reduction from a 50Kb JSON response into about 6Kb. It may be a huge deal for your mobile clients.

For a Rails application, modify config/application.rb or config/environment.rb.

``` ruby config/application.rb Acme::Application.configure do config.middleware.use Rack::Deflater end


For a Rack application, add the middleware in config.ru.

``` ruby config.ru
use Rack::Deflater
run Acme::Instance

Read on →

Consider the following two Mongoid domain models, Widget and Gadget.

``` ruby widget.rb class Widget include Mongoid::Document

field :name has_many :gadgets end

``` ruby gadget.rb
class Gadget
  include Mongoid::Document

  field :name
  field :extras

  belongs_to :widget
end

And an API call that returns a collection of widgets.

get 'widgets' do
  Widget.all.as_json
end

Given many widgets, the API makes a subquery to fetch the corresponding gadgets for each widget.

Introducing mongoid-cached-json. This library mitigates several frequent problems with such code.

  • Adds a declarative way of specifying a subset of fields to be returned part of as_json.
  • Avoids a large amount of subqueries by caching document JSONs participating in the parent-child relationship.
  • Provides a consistent strategy for restricting child documents’ fields from being returned via the parent JSON.

Using Mongoid::CachedJson we were able to cut our JSON API average response time by about a factor of 10. Find it on Github.

tl;dr - You can write 632 rock solid UI tests with Capybara and RSpec, too.

/images/2012-02-03-reliably-testing-asynchronous-ui-w-slash-rspec-and-capybara/jenkins-ci.png

We have exactly 231 integration tests and 401 view tests out of a total of 3086 in our core application today. This adds up to 632 tests that exercise UI. The vast majority use RSpec with Capybara and Selenium. This means that every time the suite runs we set up real data in a local MongoDB and use a real browser to hit a fully running local application, 632 times. The suite currently takes 45 minutes to run headless on a slow Linode, UI tests taking more than half the time.

While the site is in private beta, you can get a glimpse of the complexity of the UI from the splash page. It’s a rich client-side Javascript application that talks to an API. You can open your browser’s developer tools and watch a combination of API calls and many asynchronous events.

Keeping the UI tests reliable is notoriously difficult. For the longest time we felt depressed under the Pacific Northwest -like weather of our Jenkins CI and blamed every possible combination of code and infrastructure for the many intermittent failures. We’ve gone on sprees of marking many such tests “pending” too.

We’ve learned a lot and stabilized our test suite. This is how we do UI testing.

Read on →

[TL;DR: To supplement Heroku-managed app servers, we launched custom EC2 instances to host Delayed Job worker processes. See the satellite_setup github repo for rake tasks and Chef recipes that make it easy.]

Artsy engineers are big users and abusers of Heroku. It’s a neat abstraction of server resources, so we were conflicted when parts of our application started to bump into Heroku’s limitations. While we weren’t eager to start managing additional infrastructure, we found that–with a few good tools–we could migrate some components away from Heroku without fragmenting the codebase or over-complicating our development environments.

There are a number of reasons your app might need to go beyond Heroku. It might rely on a locally installed tool (not possible on Heroku’s locked-down servers), or require heavy file-system usage (limited to tmp/ and log/, and not permanent or shared). In our case, the culprit was Heroku’s 512 MB RAM limit–reasonable for most web processes, but quickly exceeded by the image-processing tasks of our delayed_job workers. We considered building a specialized image-processing service, but decided instead to supplement our web apps with a custom EC2 instance dedicated to processing background tasks. We call these servers “satellites.”

We’ll walk through the pertinent sections here, but you can find Rake tasks that correspond with these scripts, plus all of the necessary cookbooks, in the satellite_setup github repo. Now, on to the code!

First, generate a key-pair from Amazon’s AWS Management Console. Then we’ll use Fog to spawn the EC2 instance.

require 'fog'

# Update these values according to your environment...
S3_ACCESS_KEY_ID = 'XXXXXXXXXXXXXXXXXXXX'
S3_SECRET_ACCESS_KEY = 'xxxxxxxxxxxxxxxxxxxxxxxxxxxxxxxxxxxxxxxx'
KEY_NAME = 'satellite_keypair'
KEY_PATH = "#{ENV['HOME']}/.ssh/#{KEY_NAME}.pem"
IMAGE_ID = 'ami-c162a9a8'  # 64-bit Ubuntu 11.10
FLAVOR_ID = 'm1.large'

connection = Fog::Compute.new(provider: 'AWS',
  aws_access_key_id: S3_ACCESS_KEY_ID,
  aws_secret_access_key: S3_SECRET_ACCESS_KEY)

server = connection.servers.bootstrap(
  key_name: KEY_NAME,
  private_key_path: KEY_PATH,
  image_id: IMAGE_ID,
  flavor_id: FLAVOR_ID)

Next, we’ll do some basic server prep and install our preferred Ruby version.

Read on →

We do a lot of image processing at Artsy. We have tens of thousands of beautiful original high resolution images from our partners and treat them with care. The files mostly come from professional art photographers, include embedded color profiles and other complicated features that make image processing a big deal.

Once uploaded, these images are converted to JPG, resized into many versions and often resampled. We are using CarrierWave for this process - our typical image uploader starts like a usual CarrierWave implementation with a few additional features.

Read on →

Zach Holman gave a good talk on How GitHub uses GitHub to build GitHub at Rubyconf. It was great to hear how similar our own processes are at Artsy, with a few notable differences.

Artsy engineers store almost everything on GitHub. We use GitHub Wikis, but don’t use GitHub Issues much. We work in 3-week sprints with Pivotal Tracker instead. This blog is on GitHub. And, of course, we have our own Hubot which feeds funny animated GIFs after each successful deploy to our IRC channel.

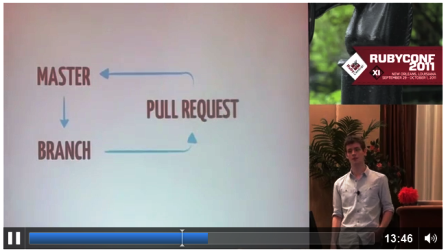
The most interesting part for me was around these two slides.

Pull

Fork

Zach emphasized that you don’t need forks to make pull requests. While technically true, I find forks particularly useful to keep things clean.

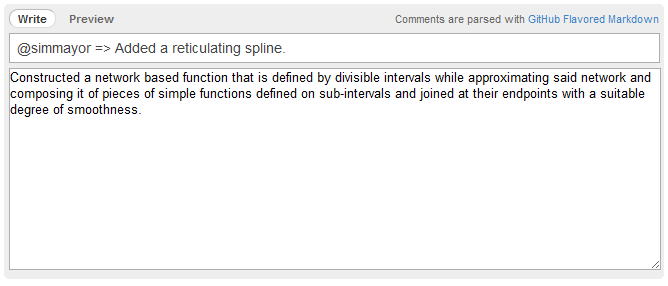
At Artsy we use personal forks to work on features, create topical branches and make pull requests into the master from there. This is the workflow of the vast majority of open-source projects too. Now, Zach is right, you don’t want to create any second class developers - our entire team has write access to the master. We use pull requests from forks to do peer code reviews, even for trivial things. I would typically make a pull request including the person I’d like to code review my changes in the title. Here’s an example.

Targeted Pull Request

(Notice the use of hash rocket. Zach, Ruby has transcended our lives too.)

Working on forks keeps developer branches away from “master”. The main repository only has three branches: “master”, “staging” and “production” and each developer can make up whatever branching strategy they like in individual forks.

Code reviews have nothing to do with hierarchy or organization, any developer will code review any other developer’s work. We tend to avoid using the same person for two subsequent code reviews to prevent excessive buddying. Zach called his pull requests “collective experiments” - a place for active discussions, rejections and praise. I really like that. Each of my rejected pull requests has been a great learning experience.