The Artsy team faithfully uses Jenkins for continuous integration. As we’ve described before, our Jenkins controller and 8 agents run on Linode. This arrangement has at least a few drawbacks:
- Our Linode servers are manually configured. They require frequent maintenance, and inconsistencies lead to surprising build failures.
- The fixed set of agents don’t match the pattern of our build jobs: jobs get backed up during the day, but servers are mostly unused overnight and on weekends.
The Amazon EC2 Plugin allowed us to replace those agents with a totally scripted environment. Now, agents are spun up in the cloud whenever build jobs need them.
To set up the build agent’s Amazon Machine Image (AMI), we started from an official Ubuntu 11.10 (Oneiric Ocelot) AMI, ran initialization scripts to set up our build dependencies (MongoDB, Redis, ImageMagick, Firefox, RVM, NVM, etc.), packaged our modified instance into its own AMI, and then set up the EC2 Plugin to launch instances from this custom AMI.
Our AMI setup steps are captured entirely in a GitHub gist, but because our build requirements are specific to our applications and frameworks, most organizations will need to modify these scripts to their own use cases. Given that caveat, here’s how we went from base Ubuntu AMI to custom build agent AMI:
- We launched an Ubuntu 11.10
AMI
4dad7424via the AWS console. - Once the instance was launched, we logged in with the SSH key we generated during setup.
-
We ran the following commands to configure the instance:
curl -L https://raw.github.com/gist/3085368/_base-setup.sh | sudo bash -s sudo su -l jenkins curl -L https://raw.github.com/gist/3085368/_jenkins-user-setup.sh | bash -s - From the “Instances” tab of the AWS Console, we chose the now-configured instance, and from the “Instance Actions” dropdown, selected “Stop”, followed by “Create Image (EBS AMI)”.
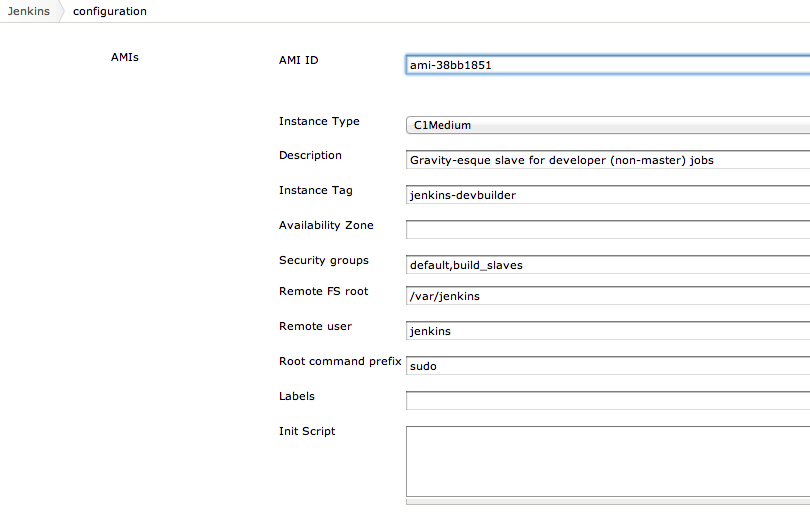
Next we installed the Amazon EC2 Plugin on our Jenkins controller, and entered the following configuration arguments for the plugin. (Replace the AMI ID with your own, the result of Step 4 above.)
New build agents began spawning immediately in response to job demand! Our new “Computers” page on Jenkins looks like this:
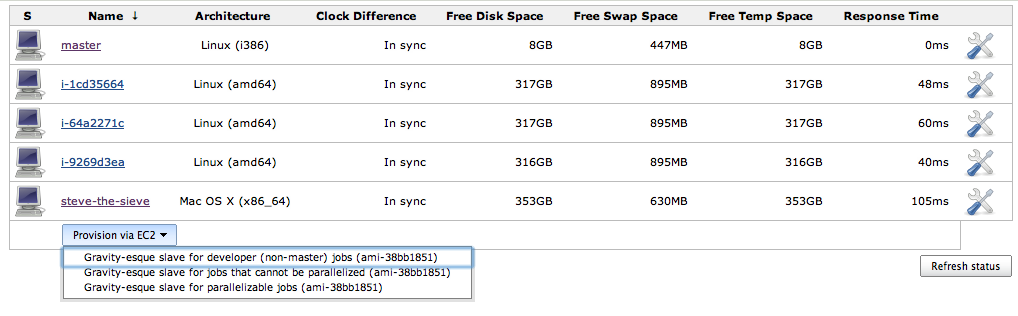
We have the option of provisioning a new build agent via a single click, but so far, this hasn’t been necessary, since agents have automatically scaled up and down with demand. We average around 4-8 build agents during the day, and 0-1 overnight and on weekends.
Outcome and Next Steps
This arrangement hasn’t been in place for long, but we’re excited about the benefits it’s already delivered:
- Builds now take a predictable amount of time, since agents automatically scale up to match demand.
- Agents offer a more consistent and easily maintained configuration, so there are fewer spurious failures.
- Despite higher costs on EC2, we hope to spend about the same (or maybe even less) now that we’ll need to operate only the controller server during periods of inactivity (like nights and weekends).
As proponents of automating the hard stuff, we get a real kick out of watching identical agents spin up as builds trickle in each morning, then disappear as the queue quiets down in the evening. Still, there are a few improvements to be made:
- Our canonical agent’s configuration should be scripted with Chef.
- Sharp-eyed readers will notice that our Jenkins controller is still a Linode server. It might benefit from the same type of scripted configuration as the agents.
- Cooler still would be for the EC2 plugin to take advantage of Amazon’s spot pricing. Though not supported at the moment, it would allow us to spend a fraction as much (or spend the same amount, but on more powerful resources).
Editor’s Note: This post has been updated as part of an effort to adopt more inclusive language across Artsy’s GitHub repositories and editorial content (RFC).
Comments