In 2017, Apple released ARKit to universal acclaim. It’s a solid foundation for application developers to build Augmented Reality (AR) experiences without learning a whole new skillset in computer vision. Like a lot of Apple’s technology, it’s a clever blend of existing projects: SceneKit, CoreMotion, CoreML and some very clever camera work. From the developer’s perspective, ARKit has an API which fits perfectly with the rest of Apple’s APIs. You spend most of your time working with a few delegate functions and you’re good to go.
For the last 2 months, I’ve been working with ARKit on a replacement for our View in Room feature on modern iOS devices to support a “View in My Room”. I’m going to try cover how we approached the project, the abstractions we created and give you a run through of how it works.
We believe that our implementation is a solid improvement over similar features in other apps that allow users to place artworks on walls, and we’re making the source code available free and open-source under the MIT license.
How does ARKit work?
You start up ARKit by creating an AR Session and passing it to an view on your screen. This will trigger ARKit to open your camera looking through the phone’s camera for reference points to determine where the phone is in the world. Your app will use the reference points to attach SceneKit objects to places through the AR viewport. Let’s look at this as a diagram:
- You have a phone in a room
- ARSession starts
- It detects some feature points
- You can then attach objects to those points
With ARKit at release in iOS 11.0, if enough feature points are detected in a series horizontally, then ARKit will also send you some information about the what it considers to be a horizontal plane.
Planes are what most AR apps use on iOS, the apps react to discovering a flat horizontal surface and then allows putting 3d objects on to it. You would then interact with these object by doing a hit test for the closest plane or feature point to handle user interactions.
Quick glossary
-
Feature Point - A physical point of reference created by ARKit. A feature point is found in a frame of the camera’s image. The point is converted into a 3D world coordinate space by image analysis that ARKit performs to track the device’s position, orientation, and movement. Taken together, these points roughly correlate to real-world objects through the view of the camera.
-
Anchor - An anchor is a developer tool for building on top of feature points. Anchors allow connections between a real-world object and an augmented-reality object. Effectively, this provides the API to place objects in “the room.”
-
Plane - An anchor to a rectangle in 3D space. A set of feature points detected in a continuous direction. You can request for ARKit to find these for you, and common examples are tables, floors and walls.
-
Hit Test - Projects a line through the world from a location on the screen and oriented with the phone’s world position and angle. This gives you a list of objects that intersect the line.
AR at Artsy
We did some interesting work in the AR space already in 2017 with Microsoft, Studio Drift and the Armory Show using the Holo Lens. When ARKit came out, we explored whether we could reliably place an artwork on a wall, but came to the conclusion that the technology was a bit too immature for us to build it reliably. The core problem was that ARKit at release could only be used to find horizontal planes.
Here’s how our original approach worked:
- Open up ARKit and let it discover the world
- Detect the edge of a floor by asking a user to point at the floor near the wall
- Find the edge furthest away
- Attach a work to the floor closest to the wall
This could work, but it was hard to explain for a first time user. A user spent most of their time with their phone pointed at the floor, then we had no way to know if feature points had been detected all the way to the floor edges.
From there, we experimented with using the location of the iPhone as a point of reference:
- Open up ARKit and let it discover the world
- Ask a user to put their phone against the wall
- When the camera is fully osbscured, use the last known point as an anchor
- When the user pulls back and reconnects, place the work
We got this to a point where it was working most of the time. One of the core issues was that there’s a lot of guess-work at the end of the process. The artwork would usually be at the position of your phone, but it was rarely oriented correctly. We experimented by placing the artwork a meter away, but in user testing very few people could do that roughly in their head, and we opted to use the exact position of the phone. This meant that you had to move to touch the wall, then come back to see if the artwork was placed correctly.
This user flow was hard to explain, and it felt like we weren’t setting people up to win. It was quite a debate about whether we could ship with this or not because we wanted to ship Quality worthy of Art. Then we read about the upcoming changes in ARKit 1.5. Vertical plane detection. Or, mostly wall detection. The debate over whether our initial approach was good enough became moot.
With the advent of vertical wall detection, we could change our flow to be a lot like what someone would have thought it should be:
- Open up ARKit and let it discover the world
- Ask a user to point at a wall
- Use the feature detection to detect a plane
- Use that plane to place an artwork
This seems almost perfect, except that it only works in theory. In practice, you don’t get enough feature points on a blank wall. Recommending user point their phone at a blank wall (the kind of wall you’d place an artwork on) is likely to end up in frustration. So instead, our user flow is:
- Open up ARKit and let it discover the world
- Ask a user to point at an existing object on a wall
- Expand the discovered plane in all directions
- Use the extended plane to place an artwork
🎉 - you have the Artsy workflow for putting a work on the wall.
Abstractions
While we were not initially sure about how well ARKit would work out for us, we thought the best way to get our feet wet would be to work with a contractor. We knew @lazerwalker through the iOS dev community and asked if he was interested in prototyping it out. He built out a demo application of the first design iteration, you can see it here as it’s MIT licensed.
I took his prototype and merged it into our app Eigen. From there, I started to turn the prototype into
production code. We effectively had two state machines: one that was handling the internal state of the AR world, and
another which handled the user interface from the UIKit world. We kept these in sync by having two protocols:
ARVIRInteractive and ARVIRDelegate.
They didn’t end up being that complex, you can see them in ARAugmentedVIRInteractionController.h. In fact,
the story of AR at Artsy is that most of this is not too complex. Which I think is a testament to how well thought-out
ARKit is.
So to make it work, we have a reasonably complicated UIViewController subclass,
ARAugmentedVIRViewController.m which handles presenting a user interface above the camera, then an
interaction controller ARAugmentedVIRInteractionController.m which handles all of the interactions inside
AR. By using protocols to communicate between two, I could test out different AR interactions by duplicating the
existing interaction controller and iterating on a new object for a while. This made it possible to prototype a few
ideas, then switch between them - saving on dev time as this project wasn’t a good fit for React Native.
React Native is really great for nearly every screen we deal with typically. We tend to basically build pretty screens of JSON. This experience is far from that. It requires constantly changing states between two very separate but linked worlds. One of the biggest advantages to doing it in React Native would have been using it for cross-platform work, but that’s speculative as only ARKit supports vertical plane detection today. We’d have had to either use a dependency, or build our own simpler bridge from ARKit to JS and maintain that. It just felt like a lot of work for a one-off section of the app.
Testing this code turned out to not be too valuable, I have tests that cover a lot of the UIKit level work but I avoided writing tests for ARKit code. It was changing too often, and was often exploratory. Also, our tests run on iOS 10, which doesn’t support ARKit anyway. So those tests would not run on CI.
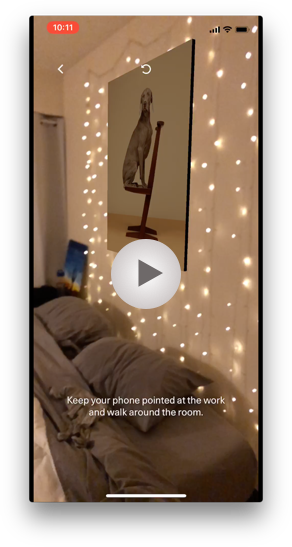
Demo
Wonder what it looks like in production? Click through for a video of it in action in my “cosy” manhattan bedroom:
We explicitly aimed to try and have this project as free as possible from dependencies so that others could re-use this code. It’s not quite generic enough to warrant making it’s own CocoaPod, but it’s MIT licensed and most of the dependencies are to do with user-interface styling and testing, which should be easily replaced in another codebase. Let us know if you’ve explored adding something it to your app or have questions!