Model View ViewModel has become the default way I write apps on iOS – it makes writing iOS apps a joy. I’ve written about it again and again and oh my.
But last Autumn, as our team was all-hands-on-deck to wrap up the auctions kiosk app, we chose not to use MVVM. Why not?
We were building a new app in a new language using a non-Swift framework for functional reactive programming. I was also teaching colleagues what they needed to know about ReactiveCocoa to help write the app. We used the MVC pattern because the relative cost of MVVM was too high.
“… was …”
Since then, I’ve been pecking away at converting small view controllers away from MVC, to figure out what MVVM on iOS written in Swift might look like. My goal has been getting ready to cut down our behemoth main view controller and create a view model for it. Before the rewrite, it was nearly 600 lines of code and was responsible for:
- networking.
- syncing auction lot states.
- user interaction.
- collection view layouts.
- image caching.
- background-thread data processing.
It’s quite terrifying now that I think about it!
Well, finally I was ready. The view controller is now down to 224 lines, and is responsible for only things like displaying data. Calculating what to display and when to display it is now contained within the view model. In true MVVM form, our view controller doesn’t even have direct access to the models it displays!
So what does MVVM in Swift look like? Well, our answer is just that – our answer. Others exist, and they have merits and faults of their own.
I’m not here to preach a definitive definition of MVVM in Swift. Instead, I want to talk about some of the lessons we learnt in the process of building a solution that worked for us.
Programming boils down to getting certain bits of code to communicate with other bits in an intelligent way. Software patterns are ways of constraining programmers to make it easier to program.
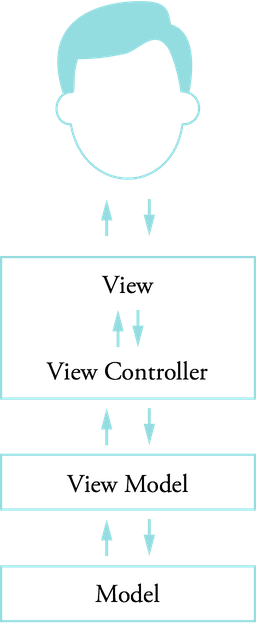
MVVM, roughly, has the following constraints:
- Models don’t talk to anybody (same as MVC).
- View models only talk to models.
- View controllers can’t talk to models directly; they only interact with view models and views.
- Views only talk to the view controllers, notifying them of interaction events (same as MVC).
And that’s pretty much it. It’s not that different from MVC – the key differences are:
- There’s a new “view model” class.
- The view controller no longer has access to the model.
Additionally, MVVM on iOS acknowledges the one-to-one relationship between views and view controllers. I tend to think of them as one entity that just happens to be split across a .swift file and a Storyboard.
The view model’s job is to handle all presentation logic. If a model contains an NSDate, the NSDateFormatter to format that date would live in the view model.
View models don’t have any access to the user interface. You should not even import UIKit in a view model. Typically, a view controller observes the view model somehow to know when there’s new data to display. This can be done through KVO or FRP.
MVVM and MVC share a common weakness: neither defines where the network logic of an app should go. I’ve put it in the view model for now, but I plan on separating it out into its own object soon. That object will be owned by the view model.
So let’s talk about some specific challenges we had.
User Interface Structure
Part of our user interface consists of a segment control near the top of the screen. The currently selected segment determines the sort order of the collection view cells, as well as the collection view’s layout. We had previously defined an enum to store the titles and sort order corresponding to each segmented control; the order of the enum cases implies the order of the controls in the UI.
enum SwitchValues: Int {
    case Grid = 0
    case LeastBids
    case MostBids
    case HighestCurrentBid
    case LowestCurrentBid
    case Alphabetical
}
So where does this enum live in MVVM? Since the logic for sorting models, the button titles, and the order of the buttons are all pieces of presentation logic, the enum seems like it belongs in the view model.
However, the decision of which layout for the collection view to use is slightly more nuanced. The layout doesn’t affect what data we show the user or how they interact with it; it only affects the visuals how the information is presented. This suggests the logic for deciding layouts might belong in the view controller.
My solution was to put the enum in the view model, and have the view model expose a signal defining which of the two layouts should be used. Based on the selected segment index, the view model decides which layout should be used and sends that value on a signal. The view controller is responsible for mapping that signal into a configured layout, then setting that layout on the collection view.
// Respond to changes in layout, driven by switch selection.
viewModel.gridSelectedSignal.map { [weak self] (gridSelected) -> AnyObject! in
    switch gridSelected as? Bool {
    case .Some(true):
        return ListingsViewController.masonryLayout()
    default:
        return ListingsViewController.tableLayout(CGRectGetWidth(self?.switchView.frame ?? CGRectZero))
    }
}.subscribeNext { [weak self] layout -> Void in
    self?.collectionView.setCollectionViewLayout(layout as! UICollectionViewLayout, animated: false)
}
The view controller also uses this signal to define which cell reuse identifier should be used.
// Map switch selection to cell reuse identifier.
RAC(self, "cellIdentifier") <~ viewModel.gridSelectedSignal.map { gridSelected -> AnyObject! in
    switch gridSelected as? Bool {
    case .Some(true):
        return MasonryCellIdentifier
    default:
        return TableCellIdentifier
    }
}
Structuring a View Model
The most common question from iOS developers about MVVM and FRP concerns how the view model exposes data to the view controller. The view controller needs to be notified about changes to the underlying model, but what mechanism do we use to do this? There are two options:
- Use (dynamic) properties on the view model, which can be observed using KVO (or wrapped in a signal/sequence using FRP).
- Use signals/sequences/futures as properties on the view model, which can be consumed by their corresponding async frameworks.
The first option is appealing since it gives your view controller a choice of how to observe the properties. However, I’d recommend against it; Swift doesn’t have type-checking on KVO (you need to cast from AnyObject! a lot).
The second option is what I prefer, and it seems the most “Swift” way of doing things. When we do move away from RAC’s Objective-C interface, the view model will replace its RACSignal properties with sequences based on Swift generics, which will provide compile-time type-checking 💯
Defining these signals on a view model can be tricky. Swift initializers have strict rules around when properties are assigned. The signals need access to the internal state of the view model, so they need to be created after calling super.init(). However, we can’t call super.init() until all our properties have been assigned to, including the signal properties.
It’s your standard chicken-and-the-egg problem 🐣
I took the easy way out and used implicitly-unwrapped optionals, defined with var, which can be assigned to after the call to super.init(). It’s not a perfect solution. We could instead use lazy var properties assigned to self-evaluating closures, or just use computed properties. I’m hoping to explore other options when we move away from RAC 2’s Objective-C API.
Handling User Interaction
The next problem I had was presenting details based on user interaction. Users tap a button, which is handled in the view controller, which presents the details. However, the view controller should not have access to the models, so how can it configure the details to present them?
My solution took advantage of the interchangeability of Swift functions and closures. First I defined a closure type in the view model.
typealias ShowDetailsClosure = (SaleArtwork) -> Void
Then I added a property to the view model and a corresponding parameter to the initializer.
class ListingsViewModel {
    let showDetails: ShowDetailsClosure

    init(...
         showDetails: ShowDetailsClosure,
         ...
Next I need to actually call the closure. I defined a function on the view model that the view controller can invoke, passing in the context that’s necessary to decide which model’s details should be presented. This context is just an index path.
func showDetailsForSaleArtworkAtIndexPath(indexPath: NSIndexPath) {
    showDetails(sortedSaleArtworks[indexPath.item])
}
Nice! So now when the user selects a cell, we can call this function on the view model with the index path that the user selected. The view model decides which model to use, and calls the closure.
The final piece of the puzzle is being clever about creating the view model. We need to pass a closure to its initializer, one that shows the model’s details. I defined a function on the view controller that matched the ShowDetailsClosure signature.
func showDetailsForSaleArtwork(saleArtwork: SaleArtwork) {
    performSegueWithIdentifier(SegueIdentifier.ShowSaleArtworkDetails.rawValue, sender: saleArtwork)
}
And then use lazy loading (discussed below) to call the view model’s initializer. I pass in a reference to the above function as the closure parameter.
lazy var viewModel: ListingsViewModelType = {
    return ListingsViewModel(..., showDetails: self.showDetailsForSaleArtwork, ...)
}()
So let’s review what happens when a user makes a selection.
</div></div> <div class='meta-container'><header> </header></div><div class='date-container'> </div><div class='content-container'><div class='entry-content'>
Here are the steps:
- User taps a cell.
- A callback on the view controller is invoked with the selected index path.
- The view controller tells the view model which index path was selected.
- The view model looks up the corresponding model.
- The view model invokes the
showDetailsclosure given to it when it was initialized. - The
showDetails“closure” performs a segue with the model.
It’s not an ideal solution since it still exposes the model to the view controller (even under very strict conditions), but it’s a reasonable compromise. As we continue to use more view models, I’m curious to see how this solution scales.
Testing
Earlier I mentioned the lazy closure property in the view controller. This is a trick that lets the view controller customize the view model by using references to self.
lazy var viewModel: ListingsViewModelType = {
    return ListingsViewModel(
        selectedIndexSignal: self.switchView.selectedIndexSignal,
        showDetails: self.showDetailsForSaleArtwork,
        presentModal: self.presentModalForSaleArtwork
    )
}()
The viewModel property is first accessed by the view controller in viewDidLoad(), which means that we can replace the property by a test double any time before that.
The view controller is tested using snapshots to verify the user interface hasn’t been inadvertently changed. Testing is straightforward:
- Create a view controller to test.
- Create a stubbed view model, customized for each test.
- Give the view controller the stubbed view model before
viewDidLoad()is called. - Verify the view controller renders correctly.
While writing tests, I found it difficult to subclass the existing view model (for stubbing purposes). Since the view model’s initializer has side-effects (starting recurring network requests 😬), I can’t call super.init(). Instead, I made a ListingsViewModelType protocol. The view controller only interacts with the view model through this protocol – it has no reference to the class itself. Now creating a stubbed view model is as easy as conforming to a protocol.
Seems more “Swift”, too.
Now that the view model and view controller are separate objects, we no longer have to test presentation logic in the view controller at all. The view model now takes care of network requests, data processing, etc – this is now all tested independently of the user interface 🎉
In my opinion, the key benefits of MVVM boil down to the following:
- Separating the view model from the user interface makes it easier to test presentation logic.
- Separating the view controller from the presentation logic makes it easier to test the user interface.
This is only a description of what we’ve come up with so far. As our community and the Swift language continue to evolve, hand-in-hand, we’ll re-evaluate our answer to the question of what MVVM with Swift looks like. For now, I’m quite pleased with the step we’ve taken, and I’m looking forward to continuing to explore programming patterns in Swift.
Comments