Prior to starting at Artsy, I followed a few online tutorials on iOS development. But a simple application demonstrating how to build a todo list didn’t illustrate the nuances of a production codebase. Tutorials are an important learning tool for beginners, but can’t possibly prepare you for everything you would encounter within an application like Artsy’s.
I was lucky to have a mentor at Artsy to help me get started, and I wrote this post to pass along the lessons I learned. This is meant to be a guide for iOS beginners to get to know an open source production codebase. I’ll cover the Xcode project organization and where to find things.
Artsy names its GitHub repositories after physics terms. iOS apps all start with the letter ‘e’, and this one is called eigen. As Artsy’s consumer-facing iOS app, users refer to it simply as “Artsy”.
Eigen is divided into two projects: one that contains all eigen-specific code, and one that contains reusable libraries. We organize these two components using something called an Xcode workspace.
The first time I opened eigen, the project wouldn’t compile because it didn’t have access to the components in the other project, the one with the libraries. To make sure that all the components you need are accessible in one place, Xcode organizes these projects under one workspace.

The Artsy project contains all the eigen-specific code. It’s where you’ll find all the classes, models, views, controllers, and resources like images and sounds. It’s what makes eigen eigen.
The Pods project is where the open source libraries used by eigen are kept. Artsy uses something called CocoaPods to organize these libraries, but that’s beyond the scope of this post. For more information about CocoaPods, check out their site.
Xcode organizes the different files of the Artsy project into folders. Let’s take a look at each one.
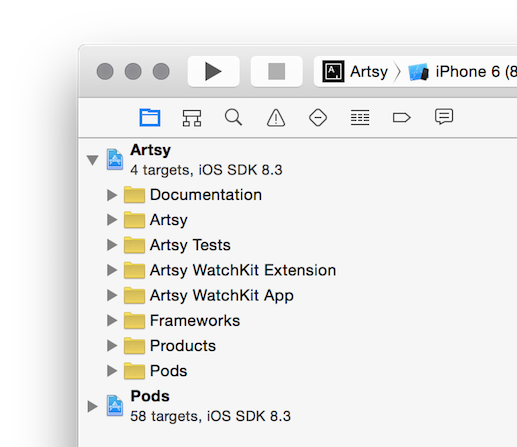
The Documentation folder contains instructions for iOS developers, such as how to started with eigen, how to deploy the application, and its changelog.
Note that documentation isn’t always part of the actual Xcode project. Sometimes it lives in the Finder folder, but Xcode doesn’t know about it.
The next folder is the Artsy folder. This is aptly named since it contains only the code and resources specific to the Artsy iOS app. This is where you would find anything that the user would interact with: the user interface, images, and the inner workings of our app. Most work of our work is done here.
Our automated tests live in the Artsy Tests folder. Since we have multiple developers working on this app, automated tests ensure that when someone changes something, the app continues to function as expected.
I find tests reassuring. As a beginner, tests provide peace of mind by letting me know if the changes I make have repercussions elsewhere.
Those are the important folders, but there are a few others you may be curious about.
Artsy has experimented with an Apple Watch extension, but it’s nothing we’ve shipped yet. The Artsy WatchKit folders don’t contribute to the rest of the application, and can be ignored. For now.
You’ll notice the Frameworks, Products, and Pods folders. All three of them are generated by either Xcode or CocoaPods. They support the app, but a developer doesn’t often work with them or their contents.
This is a nice introduction to the structure of eigen, but this is only how we do things. Just like how tutorials helping you get started aren’t necessarily applicable in the workplace, this guide isn’t a applicable to every project.
I hope this makes eigen less intimidating. I had a mentor to walk me through things, and I hope this guide helps you explore the codebase, too. If you have any questions about how we do things, get in touch!
Comments